Thursday, February 9, 2012

Of portraits and figures

Here is something I thought I would never do and that is paint a portrait and/or figure.  Not because I dislike people, but because I didn't think I would be able to do it.  I still don't know if I will be able to do it but now I hope so.  Believe it or not, the two paintings are of the same girl.  My class did the full body painting one week and then the portrait the next.  According to my wife, the poor girl looks like a long haired man holding a knife in the full body painting.  I can't say I disagree with her.

I am somewhat happy with the portrait painting so far.  I also enjoyed doing it.  I am still struggling with getting the three dimensional look but I think I am a lot closer with this portrait.  I mixed up three shades of the skin tone to represent the highlights, mid-tones and shadow.  From a few feet back she actually looks somewhat 3D.  I will work on it in the coming weeks using reference photos I took at the end of the class.  I hope I can really learn to do a decent portrait.

I learned that in painting, just like photography, that lighting is key.  We had horrible overhead fluorescent lighting that really gave very little modeling to the girl.  I can see when doing portraits or a still life or anything really, that lighting is very important.  I knew that it was for photography but it is just as important to painting and for the same reasons.  It is the light we are trying to capture after all.


Thursday, February 2, 2012

The color matrix - final update

I finally finished the warm color matrix last night. I finished the shades for the tertiary colors. This has been quite the exercise but it has been well worth it. Now I have some idea how to get the color I want. This matrix provides 84 different colors, shades and tints but there are still lots of colors this matrix doesn't cover. For now this gives me a good start. I will, at some point in the future, do this again for the cool colors.

When I do this again, I will start off more slowly on the tints. There is a big difference between the pure color and the first tint which was done at a 1:1 mix of the pure color and Titanium white. Next time I will start with a 2:1 ratio of the pure color to titanium white. The shades don't use the ratio I marked along the side. When you start shading (darkening) a color, it darkens quickly. It doesn't take much of the complementary color to really darken a color so it is best to add just a very little bit, mix it up and then add more if needed. Just like the saying goes in carpentry, measure twice and cut once, in paint mixing, start light and work toward darker. Once you darken it, you can't lighten it again. Well, technically you can because you can add more of the original color you are trying to darken but it will take a lot of that color to lighten it again.

The warm color matrix

Monday, January 30, 2012

The color matrix part 3, creating shades

I am halfway finished with creating shades of the colors.  I have the primary and secondary colors done.  I relearned that colors darken quickly.  It takes very little of the complementary color to darken a color.  I wasn't sure I would like the shades as well as I liked the tints but I do.  The red tinted down to a nice, deep red.  The blue turned a nice blue grey.  The yellow and green was beautiful as well.  Most of the colors start heading toward a shade of brown but the blue I think will darken toward black.

I have one more session to go to finish the tertiary colors and I will be done with the tints and shades of the warm color palette.  I really need to do this same exercise for the cool color palette but I think it is time I get back to real painting.  I will come back to the cool palette eventually.

Primary and secondary color shades

Sunday, January 29, 2012

Trying my hand at making blacks and greys

After doing a color wheel and a color matrix, it was now time to try my hand at black and shades of grey.  I started with an even mix of Prussian Blue and orange made from an even mix Cadmium Yellow and Alizarin Crimson.  It looks very black on the canvas.  I then added more and more white to get shades of grey.  It turned into a beautiful battleship grey which had a very slight blue tint to it.

The bottom row of colors are where I mixed Cadmium Yellow Light, Cadmium Red Medium and Cadmium Red Light with different shades of the grey paint.  The mix with the yellow turned green so you can definitely tell that it was a blue-grey paint mixture.  It created colors that I didn't have matches for on my previous exercise of creating tints.

Black & Grey Shades

Saturday, January 28, 2012

The color matrix part 2

I finished up the tints of the tertiary colors today.  Just like with the secondary colors, I really like the oranges and greens in the tertiary colors.  Next up is to do the shades.  I may take a break before tackling those.

I have two pallets full of leftover paint so I am thinking about trying to paint something with them.  Maybe some kind of flowers?  I am anxious to try out the various shades and see how they work together.


Orange and green before mixing

Orange and green after mixing

Red before mixing

Red after mixing

Final tints

Thursday, January 26, 2012

The art of the color matrix

I am back at the color wheel today, though this is not a wheel.  I thought about calling it the color square except that it is a rectangle.  Somehow color rectangle doesn't roll off the tongue very well so I call it the color matrix.  I got the idea from doing the color wheel and seeing the color recipes in various color mixing books.  It occurred to me after doing the color wheel that I am trying to paint and I don't even know what to expect when I start mixing colors.  Sure, you can read books like the Color Mixing Bible I mentioned in a prior post but there is nothing like doing it yourself.

So I decided to lay the color wheel out in a line and mix tints and shades to see how the colors react.  In case you don't know, a shade is when you darken the color and a tint is when you lighten it.  About the only way to lighten a color, as far as I know, is to add white.  For shading, you can add black but I have read in multiple places that black paint mixed with other colors leads to dead looking colors.  It seems the generally accepted way to darken a color is to add a little of its complement.

So now I had decided to do various levels of tints and shades so next up was to lay it out on a canvas board.  I created a grid of 1" squares in a 7x12 matrix on an 11x14 canvas board.  I used a T-square to be fairly precise with the layout.  I put the pure color in the middle row of the 7 rows and that left room for 3 levels of tints in the top 3 rows and 3 levels of shades in the bottom 3 rows.  So the end result will be the lightest shade on the top row and getting progressively darker down to the bottom row.  I then had to decide which column to put the colors into.  I decided to start on the left with the red hue of the color wheel and start to the right as I move clockwise around the color wheel so that the blue ends up in the far right column. I also started with the warm colors first with Cadmium Yellow Light, Cadmium Red Medium and Cerulean Blue as my primary colors.

Blank color matrix

Warm color palette

Now that I knew what I wanted to do, I had to figure out how to do it.  I grabbed a piece of palette paper and squeezed out a little of each of the 3 primary colors in a 4x3 grid on the paper.  I then added a little white next to the appropriate piles of color, starting with a little white on the 2nd row from the bottom and increasing the amount of white as I moved up rows.  The bottom row was the pure color.  The way I laid out the palette matched the way it was going to go onto the canvas board.  I went with a ratio of 1:1 for the pure color and white to start.  Then I went to a ratio of 1:2 where I had twice the white paint as the pure color.  The final ratio was 1:3.  If I ever do this again, I might use the following ratios, 2:1, 1:1, 1:2 as the colors lightened up quickly and the resulting colors were only slightly lighter than the next.


Palette before mixing

Palette after mixing

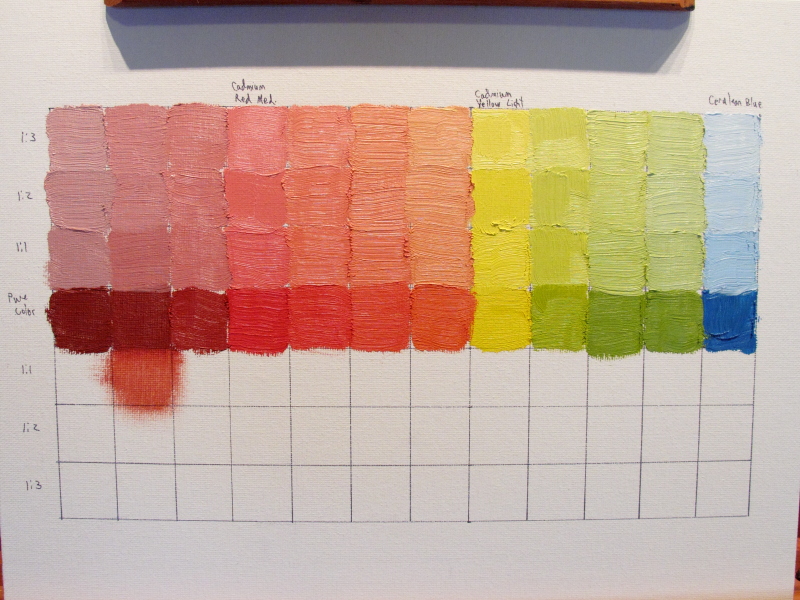
Now it was time to put the brush to canvas.  I started with the pure colors and worked my way up to match the matrix I had laid out.  I wiped the brush as clean as possible before doing each color swatch to avoid contaminating the patches of color.  The result showed subtle differences between each tint.  That shows how many variations you can create by just slowly adding more and more white.  As I mentioned above, I wish I had not started with such a strong mix for the first swatch to maybe see a little more variation.  A note about the red column is that it turns pink in a hurry when you start adding white.  The yellow and blue made beautiful tints.

The primary colors

Now that the primary colors are complete, next up was the secondary colors.  This time the mixing was a little more involved.  I added the primary colors evenly (1:1) and then added the white.  I had to use more white this time since I had twice the amount of color in each swatch.

I was anxious to see the tints of the secondary colors and they did not disappoint.  The secondary colors were beautiful, well except for the reds.  Not that the reds were ugly, but the greens and oranges were spectacular.

Ready to mix the secondary colors

The secondary colors

The primary and secondary colors

The next phase of this exercise is to create the tints for the tertiary colors.  I am anxious to see those as well. Once the tints are done it will be time to do the shades.  I am not sure how those will turn out so I am looking forward to that exercise.  As I mentioned earlier, shades should be made by adding the complementary color so there will be a lot of mixing involved in creating the shades as I will have to vary the amount of the complementary color to add.

The final part of this exercise is to do the same matrix for the cool colors.  I am sure this will be quite a tedious chore by then but it should be well worth it.  After all, how can you sit down and paint when you don't even know how the color will react to the mixes?


Saturday, January 21, 2012

The art of the color wheel

I decided since I can't seem to paint much else that I would try my hand at a color wheel. Two color wheels actually. The book "Color Mixing Bible" recommends doing a warm and a cool version so that is what I did. I traced two circles on an 11x14 canvas board and sectioned them off. The primary colors on the warm side are Cadmium Red Medium, Cadmium Yellow Light and Cerulean Blue. The primary colors on the cool side are Permanent Alizarin Crimson, Cadmium Yellow Medium and Prussian Blue.

I absolutely love the warm colors. The colors are beautiful. I expected the blue and red to create a violet color but instead it created a deep, brick red color. I have read that many artists keep a tube of purple paint with them because it is hard to mix your own and I see that I may have to do the same.

Along with the warm color wheel, I really like the right half of the cool color wheel. The colors are deep and rich. I found out that the cool blue over powers the other colors very quickly though. The blue section near the Alizarin Crimson has twice as much red as it does blue and you have too look very hard to see any difference. Reflected light is subtractive in nature, that is, the more color you mix the darker it gets, and this proves that out nicely. Now the cool yellow mixed with the cool blue very nicely creating subtle shades of dark green.

The next exercise I need to do is try mixing the warm colors with the cool colors and see what I get. One tip I saw on YouTube said not to do that because the colors end up looking muddy, but there is no better way to find out than to try it myself. Yet another exercise to try is to create shades of grey. I think I can tint a mix of Alizarin Crimson and Prussian blue with white to get shades of grey. The final exercise is to create color patches varying the amount of each color mixed to get even more shades of the colors.

This was a very worthwhile exercise and I recommend every new painter try it along with the other exercises I mentioned.

The photo doesn't fully translate the results

A look at my palette

Here is a look at my palette. This was recommended by my instructor and from my research on the internet it appears to be pretty standard. Going from left to right the paints are:
  • Titanium White
  • Cadmium Yellow Light
  • Cadmium Yellow Medium
  • Cadmium Red Medium
  • Permanent Alizarin Crimson
  • Cerulean Blue
  • French Ultramarine
  • Prussian Blue
  • Burnt Umber


I am not entirely happy with the plexiglass palette. I have some stress cracks in it from pushing down on it while holding it to clean. It is also tough to tell how the color will look on the clear palette. You can see through it or you get reflections off of it. It does clean up easily though. I will most likely get a wooden palette after I learn more about painting.